
Getting an API key
An API key lets the REST API, the CLI, and the MCP server act on your behalf. Keys are available on the Starter plan and above.
Creating a key
Section titled “Creating a key”-
In the dashboard, go to Developers → API Keys and click Create API Key.
-
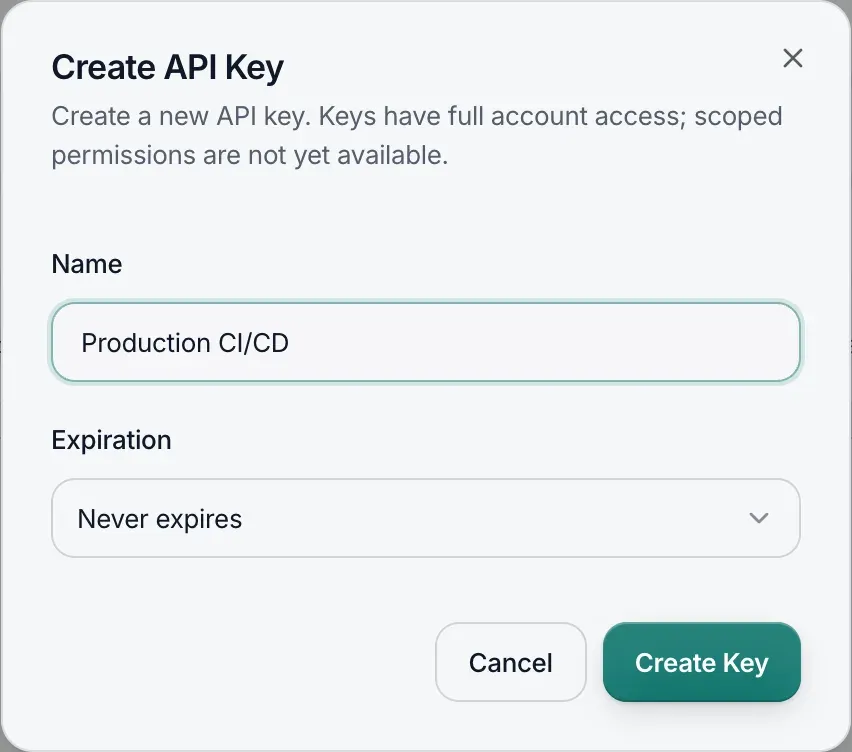
Enter a Name, such as “Production CI/CD”, and choose an Expiration: Never expires (the default), 30 days, 90 days, or 1 year. Click Create Key.
-
Copy the key from the API Key Created dialog. It’s shown only once.
Creating a key needs a role that can edit monitors: Owner, Admin, or Manager. A Viewer sees “Creating API keys requires edit permission — your role is read-only.”
What a key can do
Section titled “What a key can do”A key acts as the person who created it: every request is checked against that person’s role, so a Viewer’s key can read but not change anything. Keys can’t be limited any further yet. As the Create API Key dialog says, “Keys have full account access; scoped permissions are not yet available.”
Kinds of key
Section titled “Kinds of key”| Workspace key | Account-wide key | |
|---|---|---|
| Created by | The dashboard, POST /keys, or thq keys create |
Signing in with thq login |
| Belongs to | The workspace it was created in | Your account |
| Can reach | That workspace’s projects only. Requests for another workspace’s projects are refused. | Every project you can open. Each request uses the plan of that project’s workspace. |
| On the API Keys page | In that workspace | In every workspace you open, with an Account-wide badge. You can revoke it from any of them. |
Keys created in the dashboard start with thk_. Keys created with POST /keys, thq keys create, or thq login start with uk. Either way, the whole string is the secret.
Account-wide keys are named “CLI · <computer name> · <date>” and never expire. thq login works only if the workspace you approve it from is on a paid plan.
Using a key
Section titled “Using a key”| Tool | Where the key goes |
|---|---|
| REST API | The X-API-Key header, or Authorization: Bearer <key>. See Authentication. |
| CLI | thq login saves one for you. For CI, set THQ_API_KEY. |
| MCP server | The TUNNELHQ_API_KEY environment variable in your client’s config. |
Seeing usage
Section titled “Seeing usage”At the top of the API Keys page, you’ll see the workspace’s API usage against your plan’s limits: today, per minute, and this month, a daily chart, and requests by endpoint. It covers every key in the workspace.
Below it, the page lists each key’s Name, a Key preview, Status (Active, Disabled, or Expired), Last used, Created, and Expires.
To see one key’s usage, open its actions menu (⋯) and choose View details, or click the key’s name. The key’s page shows its requests today and over the last 7 and 30 days, a daily usage chart, and a breakdown by endpoint.
Disabling and revoking a key
Section titled “Disabling and revoking a key”| To | In the dashboard | With the API or CLI |
|---|---|---|
| Stop a key until you turn it back on | ⋯ → Disable, and later Enable | DELETE /keys/:id or thq keys revoke <id> |
| Delete a key for good | ⋯ → Revoke, then Revoke Key | DELETE /keys/:id?hard=1 or thq keys revoke <id> --hard |
A key disabled through the API or CLI shows as Disabled and can be enabled again in the dashboard. Revoking can’t be undone, and anything using the key loses access immediately. An expired key gets 401 “API key has expired”.
Keys in this workspace
Section titled “Keys in this workspace”Owners and Admins also see a Keys in this workspace section. It lists every key created in the workspace, whoever made it, and they can revoke any of them. All of these keys count against the workspace’s plan. Revoking one stops it working immediately, but doesn’t remove its owner from the workspace.
Keeping keys safe
Section titled “Keeping keys safe”- Store keys in an environment variable or a secret manager, never in source control.
- Set an expiration on keys you only need for a while.
- If a key leaks, revoke it and create a new one.
- For AI assistants, consider a read-only MCP setup.
Still stuck?
Section titled “Still stuck?”Email [email protected].